
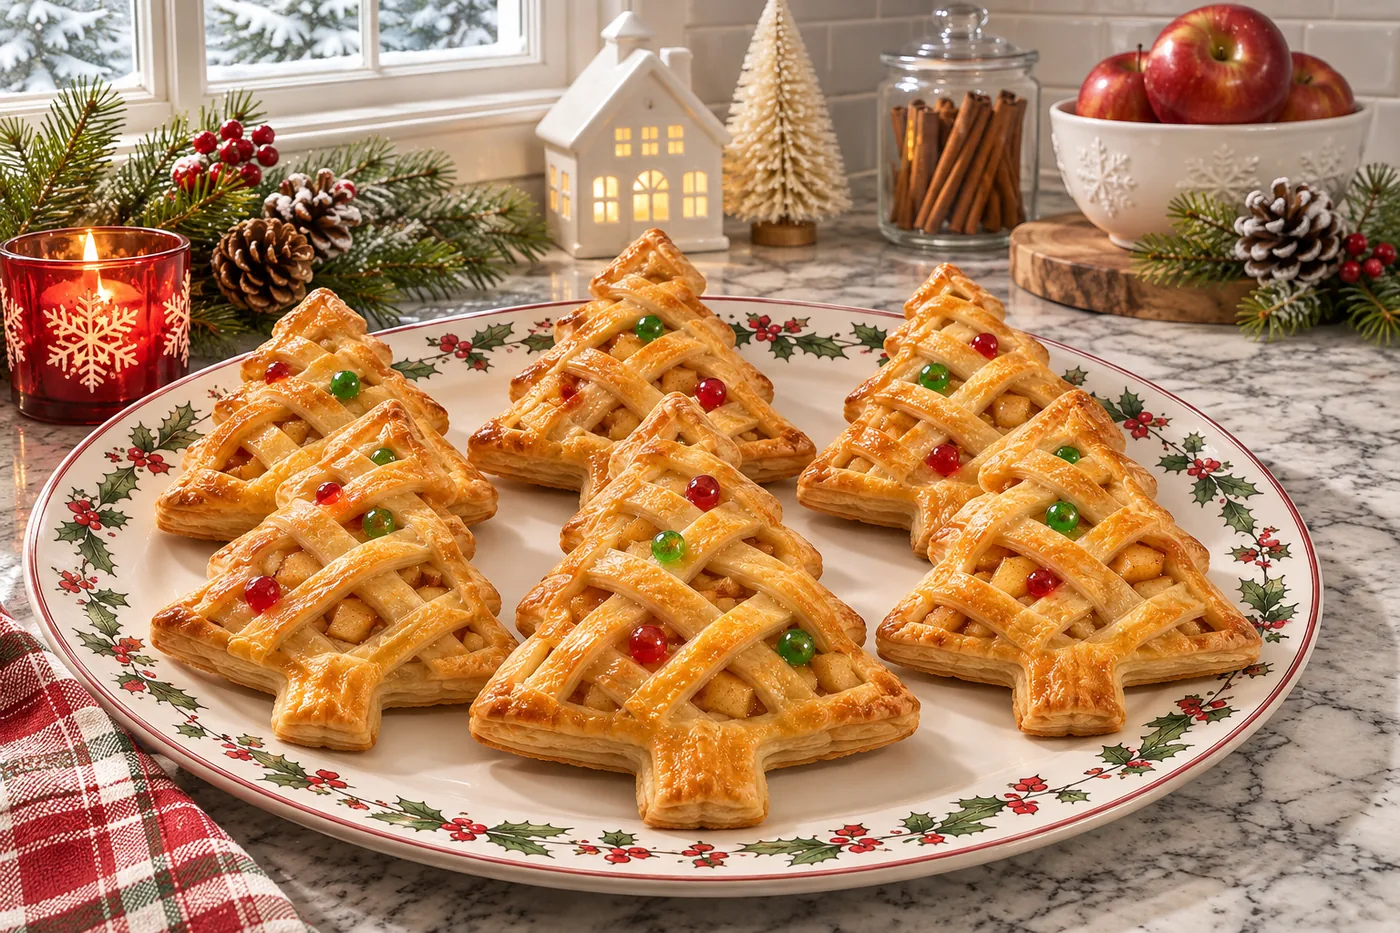
The first time I made these Christmas tree apple hand pies, my kitchen filled with the warm, sweet aroma of cinnamon and baked apples. My kids rushed in, eyes wide with excitement, and I knew I had found a winner.
What sets this recipe apart is the buttery, flaky crust paired with a spiced apple filling that just screams holiday cheer. Trust me, these little hand pies are a festive treat you'll want to share!
Why This Recipe Works
- Apple Variety Matters: Using Granny Smith apples gives the filling a perfect balance of tartness and sweetness. Their firm texture holds up well during baking, preventing the pies from becoming mushy.
- Citrus Prevents Browning: The lemon juice adds a bright flavor while also preventing the apples from browning. This keeps the filling looking fresh and appetizing, which is especially important for holiday treats.
- Spices Enhance Flavor: Cinnamon and nutmeg work together to create that warm, cozy aroma we all associate with the holidays. I tested different spice ratios and found that just the right amount brings out the best in the apples.
- Egg Wash Creates Shine: Brushing the hand pies with an egg wash before baking helps achieve a golden-brown, flaky crust. I experimented with milk and water washes, but the egg gave that beautiful sheen that makes these pies look festive.
Ingredients
What You'll Need
- 2 large Granny Smith apples these add a perfect balance of tartness and sweetness, making your hand pies deliciously flavorful.
- 1 tbsp lemon juice this prevents the apples from browning and adds a hint of brightness.
- 1/4 cup brown sugar, packed brown sugar gives the filling a rich, caramel-like sweetness.
- 1 tsp cinnamon this introduces warm, cozy flavors that are perfect for the holidays.
- 1/4 tsp nutmeg a little nutmeg adds depth and complexity to the apple filling.
- 1 tbsp all-purpose flour this helps thicken the filling and keep it from being too runny.
- 1 package store-bought pie crusts using store-bought saves time and ensures a flaky, buttery crust.
- 1 large egg, beaten this egg wash gives your hand pies a beautiful golden finish.
- 1 tbsp granulated sugar sprinkling this on top adds a pleasureful crunch and sweetness.
- 1 tsp vanilla extract vanilla enhances the overall flavor of the filling.
- 1 tbsp milk this is mixed with the egg wash for a shiny finish.
When shopping for apples, opt for firm and tart varieties like Granny Smith for the best flavor in your Christmas tree apple hand pies. The combination of spices, sugar, and the lemon juice creates a pleasureful contrast to the buttery crust, making each bite tempting.
Easy Substitutions
- Dairy-free: swap the milk for almond milk — result changes to a slightly nuttier flavor, but the egg wash will still give a nice finish.
- Gluten-free: swap all-purpose flour for a gluten-free flour blend — result changes to a slightly different texture, but the filling will still hold together well.
- Egg-free: omit the egg wash and use a dairy-free milk for brushing — result changes to a less shiny crust but still delicious.
- Lower calorie: reduce the sugar by half — result changes to a less sweet filling, but the natural flavor of the apples will shine through.
Step-by-Step Instructions
Prep & Mix
- Preheat your oven to 400°F (200°C) and line a baking sheet with parchment paper — this ensures the hand pies don’t stick and makes cleanup a breeze.
- In a medium bowl, combine diced apples, lemon juice, brown sugar, cinnamon, nutmeg, and flour. Stir until the apples are evenly coated — the flour helps absorb excess moisture, ensuring a perfect filling consistency.
- Roll out one pie crust on a lightly floured surface to about 1/8-inch thickness — this thickness gives your crust a lovely, flaky texture when baked.
Assemble & Bake
- Use a Christmas tree cookie cutter to cut out tree shapes from the rolled pie crust — try to get as many shapes as possible to minimize waste.
- Spoon a small amount of the apple mixture onto half of the tree cutouts, leaving a small border around the edges. This prevents overflow and ensures each bite is perfectly sweet and spiced.
- Place another tree cutout on top of each filled cutout and press the edges to seal. Use a fork to crimp the edges — this not only seals the pies but adds a charming touch.
- In a small bowl, whisk together the beaten egg and milk. Brush the mixture over the top of each hand pie for a beautiful golden finish when baked.
- Sprinkle granulated sugar over the top of each hand pie — this adds a pleasureful crunch and sweetness to the crust.
- Bake in the preheated oven for 20-25 minutes, or until golden brown and puffed. Keep an eye on them; the aroma will let you know they’re almost ready.
Cool & Serve
- Remove from the oven and allow to cool for 5 minutes before serving. This helps the filling set a bit so it won’t ooze out when you take a bite.
- Serve warm, optionally with a scoop of vanilla ice cream on the side. The contrast of warm pie and cold ice cream is simply tempting.
Tips & Tricks
Keep Your Apples Crunchy
I prefer using a mix of tart and sweet apples for these hand pies. My go-to combination is Granny Smith and Honeycrisp. The tartness from the Granny Smith balances the sweetness of the brown sugar beautifully, while the Honeycrisp adds that perfect crunch. If you use only soft apples, your filling might turn mushy during baking, which isn't ideal.
Seal the Deal
Don't skip the egg wash! A simple mixture of beaten egg and a splash of water brushed over the tops of your hand pies not only gives them that golden, glossy finish but also helps seal the edges better. I learned this the hard way when my first batch burst open in the oven. Trust me, it's worth the extra step for presentation and to keep all that delicious filling inside.
Pro Tips
- Chill Your Dough Before Rolling: Chilling the pie crust for at least 30 minutes before rolling makes it easier to handle and gives a flakier texture. I learned this the hard way; my first batch was tough because I skipped this step.
- Use a Fork for Sealing Edges: Instead of just pressing the edges together, use the tines of a fork to create a decorative seal. It not only looks prettier but also ensures no filling leaks out during baking.
- Add a Pinch of Salt to Filling: A tiny pinch of salt in the apple mixture enhances the natural sweetness and balances flavors beautifully. I always taste my filling before sealing to adjust sweetness, and this little trick makes a big difference.
- Experiment with Spice Blends: Don’t limit yourself to just cinnamon and nutmeg—try adding cardamom or ginger for a unique twist. After testing various spices, I found that a hint of cardamom enhances the flavor profile in a pleasureful way.
- Brush with Milk for Extra Crispiness: Instead of just using an egg wash, try brushing the tops with milk before baking for an extra crispy crust. I was skeptical at first, but the golden finish and crunch are worth the extra step.
Variations & Customizations
Flavor Twists
Cranberry Almond
Add 1/2 cup dried cranberries and 1/4 cup slivered almonds to the apple mixture. The tart cranberries pop against the sweet apples, while the almonds add a lovely crunch and nutty flavor.
Pumpkin Spice
Mix in 1/4 cup canned pumpkin puree along with 1/2 teaspoon ginger and 1/4 teaspoon cloves. These hand pies take on a warm, cozy flavor, reminiscent of fall, with a slightly denser filling.
Seasonal Versions
Chocolate Mint
Stir in 1/2 teaspoon peppermint extract and 1/2 cup chocolate chips into the apple mixture. The combination of cool mint and rich chocolate creates a pleasureful holiday treat that’s both refreshing and rich.
Storage & Meal Prep
Room Temperature
Store your Christmas Tree Apple Hand Pies at room temperature for up to 2 days in an airtight container. Make sure they cool completely before sealing; otherwise, they'll get soggy on the bottom if you stack them while still warm.
Refrigerator
In the refrigerator, they last up to 5 days. Use a covered container, and be sure to wrap them individually with plastic wrap to keep them fresh and prevent them from drying out.
Freezer
You can freeze these hand pies for up to 3 months. Flash freeze them on a sheet pan for a couple of hours before wrapping each one tightly in plastic wrap and then placing them in a freezer bag. To thaw, simply leave them in the fridge overnight.
Meal Prep
I recommend doubling the recipe for a festive batch that can last throughout the week. Prep them the night before for a quick bake in the morning or make them over the weekend. Store in a single layer in an airtight container, and they’ll stay fresh for up to 5 days. Reheat in a 350°F oven for about 10 minutes until warm and crispy.
Frequently Asked Questions
Can I use other apples instead of Granny Smith?
Yes, you can use other apple varieties like Honeycrisp or Fuji for a sweeter filling. Just keep in mind that they may require a bit more sugar since they're less tart than Granny Smith.
Why did my hand pies come out soggy?
Sogginess often happens if the filling has too much moisture. To fix this, make sure to drain any excess liquid from the apples and consider adding a tablespoon of cornstarch to thicken the mixture.
Can I make these hand pies ahead of time?
Absolutely! You can prepare the filling and dough a day in advance. Just keep them stored separately in the fridge until you're ready to assemble and bake.
How can I make these hand pies gluten-free?
To make gluten-free Christmas tree apple hand pies, substitute all-purpose flour with a gluten-free blend. Just ensure the blend contains xanthan gum for the right texture.
What can I serve with these hand pies?
These hand pies pair wonderfully with a scoop of vanilla ice cream or a dollop of whipped cream. A drizzle of caramel sauce also adds a pleasureful touch!
These Christmas tree apple hand pies are the perfect blend of flaky crust and sweet, spiced apples, making them a pleasureful treat for any holiday gathering. For an extra touch, try adding a sprinkle of cinnamon sugar on top before baking for a beautiful finish. I can't wait for you to make these — share your creations in the comments or save this recipe for your holiday baking!