
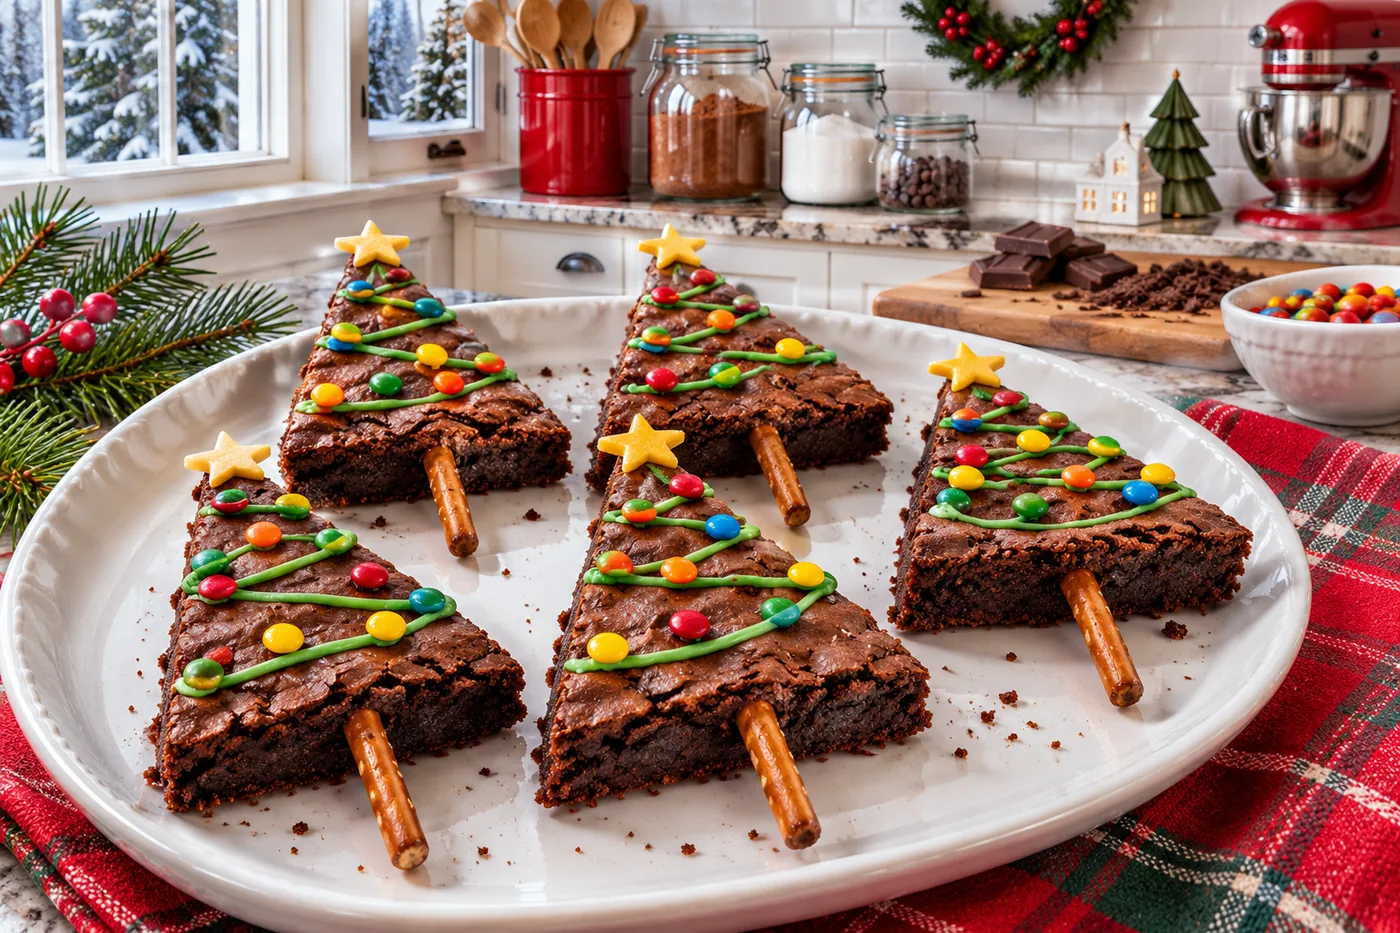
The first time I made Christmas tree brownies, my kitchen was a flurry of laughter and sprinkles. My kids couldn't believe their eyes when they saw these festive treats!
What sets this recipe apart is the rich, fudgy texture combined with colorful, edible decorations that turn each brownie into a holiday masterpiece.
Why This Recipe Works
- Cocoa powder for rich flavor: Using unsweetened cocoa powder gives these brownies a deep, chocolatey flavor that's hard to resist. The cocoa's natural fats contribute to the fudgy texture, making each bite feel rich.
- Butter enhances moisture: Melted unsalted butter not only adds richness but also helps achieve that gooey center we all love. I experimented with using oil instead, but the butter really brought out the best texture.
- Eggs for structure and lift: The eggs in this recipe provide structure while also helping the brownies rise slightly. I once tried using just one egg to make it lighter, but the texture ended up too dense.
- Frosting and candies for fun decoration: The green frosting not only adds a festive touch but also creates a fun contrast with the chocolate base. I found that using a thicker frosting helps it hold its shape better when piped.
Ingredients
What You'll Need
- 1 cup unsweetened cocoa powder choose high-quality cocoa for rich chocolate flavor.
- 1 cup granulated sugar this sweetens the brownies and balances the cocoa's bitterness.
- 1 cup all-purpose flour provides structure; use a light hand to avoid dense brownies.
- 1 tsp baking powder gives the brownies a little lift for a soft texture.
- 1/2 tsp salt enhances flavors; a must for any baked good.
- 1/2 cup unsalted butter, melted adds richness and moisture; don't substitute with margarine.
- 2 large eggs binds the ingredients together and adds moisture.
- 1 tsp vanilla extract for depth of flavor; use pure vanilla for the best taste.
- 1/2 cup chocolate chips adds melty pockets of chocolate; choose semi-sweet or dark.
- 1 cup green frosting, for decorating this is your tree's color; choose a thick frosting for best results.
- 1/2 cup red and yellow candies, for ornaments these add festive color and crunch; use your favorite candy.
- 1 cup powdered sugar, for dusting finishing touch that adds sweetness and a snowy effect.
For the best Christmas Tree Brownies, opt for high-quality cocoa and chocolate chips. This will ensure your brownies have a rich, decadent chocolate flavor. Fresh eggs and good butter are also essential for the right texture and taste.
Easy Substitutions
- Dairy-free: swap the unsalted butter for coconut oil — the result changes to a slightly different flavor profile, but still maintains moisture.
- Gluten-free: swap all-purpose flour with a gluten-free blend — the result changes to a slightly denser texture, but still delicious.
- Egg-free: replace each egg with 1/4 cup unsweetened applesauce — the result changes to a more cake-like brownie, but still holds together well.
- Lower calorie: use a sugar substitute like stevia in place of granulated sugar — the result changes to a less sweet brownie with a different texture.
Step-by-Step Instructions
Prep & Mix
- Preheat your oven to 350°F and grease an 8x8-inch baking pan — this ensures the brownies release easily after baking, giving you that perfect, clean edge.
- In a large bowl, whisk together cocoa powder, granulated sugar, flour, baking powder, and salt until well combined — this aerates the dry ingredients, making your brownies light and fluffy.
- Pour in melted butter, eggs, and vanilla extract, mixing until everything is just combined — overmixing can lead to tough brownies, so stop when the batter looks slightly lumpy.
- Gently fold in chocolate chips until evenly distributed — this adds pockets of gooey chocolate goodness throughout your brownies.
Bake & Cool
- Pour the brownie batter into the prepared baking pan and spread it out evenly — this helps them bake uniformly, avoiding undercooked centers or burnt edges.
- Bake in the preheated oven for 20-25 minutes, until the top looks set and a toothpick inserted into the center comes out with a few moist crumbs — you want some moisture for that fudgy texture, but no wet batter.
- Remove from the oven and let cool in the pan for 10 minutes — this helps them firm up and makes transferring them easier without crumbling.
- Once cooled, transfer the brownies to a wire rack to cool completely before cutting into tree shapes — this cooling step is crucial for achieving clean cuts without making a mess.
Decorate & Serve
- Use a sharp knife to cut brownies into tree shapes — this is where the fun begins, and you can create festive little trees for the holidays.
- Decorate each brownie with green frosting to resemble Christmas trees — the vibrant color adds a festive touch that brings joy to your dessert table.
- Add red and yellow candies as ornaments on the frosted trees — not only do they look beautiful, but they also add a pleasureful crunch.
- Dust with powdered sugar for a snowy effect before serving — this little detail makes your Christmas tree brownies look extra special and festive.
Tips & Tricks
The Importance of Cooling Time
Once your brownies are out of the oven, resist the urge to cut into them immediately. Letting them cool in the pan for at least 15 minutes allows the fudgy texture to set properly. I once cut too soon and ended up with a gooey mess instead of perfect squares. Trust me, the wait is worth it for clean, beautiful edges!
Choosing the Right Chocolate Chips
Not all chocolate chips are created equal! I prefer using semi-sweet chips for those perfect pockets of melted chocolate, but feel free to mix in some milk chocolate or dark chocolate for added depth. Just remember, using chips labeled as 'baking chocolate' can lead to a drier texture, which is the last thing you want in a brownie.
Pro Tips
- Use a Toothpick Test Wisely: When checking for doneness, use a toothpick and look for a few moist crumbs clinging to it. I’ve found that pulling them out of the oven too early leads to a gooey mess, while leaving them in even a minute too long can dry them out.
- Chill for Better Cutting: After baking, let your brownies cool completely in the pan before cutting. They firm up as they cool, making it easier to achieve those clean, sharp edges that look so beautiful when served.
- Add a Mint Twist: For a festive flair, consider adding a few drops of mint extract to the batter. It gives your brownies a refreshing surprise that pairs wonderfully with the chocolate, taking the flavor profile to another level.
- Layer the Frosting: If you choose to frost your brownies, consider layering it. Spread a thin layer of frosting, let it set, then add another layer for a more decadent treat. I usually use a spatula to create swirls for a beautiful finish.
- Use High-Quality Chocolate: Invest in good quality chocolate for melting. The flavor difference is remarkable, and it really shines through in the final product. I always opt for a brand that I love to eat on its own, ensuring my brownies are rich and rich.
Variations & Customizations
Flavor Twists
Minty Chocolate
Add 1 teaspoon of peppermint extract to the batter before mixing in the chocolate chips. The brownies will have a refreshing minty aroma and taste, perfect for the holidays, with a pleasureful cooling sensation.
Peanut Butter Swirl
Mix 1/2 cup creamy peanut butter into the batter before pouring it into the baking pan. Use a knife to swirl it through the mixture. The brownies will be rich and fudgy with a nutty flavor, and you'll find pockets of creamy peanut butter that add a lovely contrast.
Kid-Friendly
Rainbow Sprinkles
Fold in 1/2 cup of colorful sprinkles into the batter before baking. These brownies will turn out festive and fun, with pops of color throughout, making them tempting to kids. The texture remains fudgy, and the sprinkles add a slight crunch.
Storage & Meal Prep
Room Temperature
Store your Christmas tree brownies in an airtight container at room temperature for up to 3 days. Make sure to place a piece of parchment paper between layers to avoid sticking.
Refrigerator
In the refrigerator, they’ll stay fresh for about a week. Allow the brownies to cool completely, then wrap them individually in plastic wrap before placing them in an airtight container.
Freezer
These brownies can be frozen for up to 3 months. For best results, flash freeze them on a sheet pan first, then wrap each brownie tightly in plastic wrap. Thaw them in the fridge overnight before enjoying.
Meal Prep
I recommend doubling the recipe to have plenty of brownies on hand for holiday gatherings. Prepare them the night before your event for optimal freshness. Store them in a single layer in an airtight container, and they’ll stay delicious for up to a week. To reheat, pop them in the microwave for about 10-15 seconds until warm.
Frequently Asked Questions
Can I use a different type of chocolate instead of cocoa powder?
Yes, you can substitute cocoa powder with melted dark chocolate. Just use about 4 ounces of chocolate for every cup of cocoa powder, and reduce the fat in the recipe by 1/4 cup.
Why did my brownies come out dry?
If your brownies turned out dry, it might be due to overbaking them. Make sure to check for doneness a few minutes before the suggested baking time to keep them fudgy.
How can I make these brownies gluten-free?
To make gluten-free Christmas tree brownies, simply swap out the all-purpose flour with a gluten-free baking blend. Be sure to check that your cocoa powder is also gluten-free.
What can I use instead of eggs in this brownie recipe?
You can replace each egg with 1/4 cup of unsweetened applesauce or 1/4 cup of mashed banana. These substitutes will help maintain moisture and create a tender texture.
How should I decorate my Christmas tree brownies?
Decorate your brownies with colorful icing, sprinkles, or edible glitter to bring them to life. You can also use mini candy canes or chocolate stars for a festive touch.
These Christmas tree brownies are not just a treat; they bring a joyful spirit to your holiday gatherings with their festive look and rich chocolatey flavor. For an extra touch, consider adding some crushed peppermint candies on top for a pleasureful crunch. I can't wait for you to try these — share your creations with me in the comments or pin the recipe for later!