
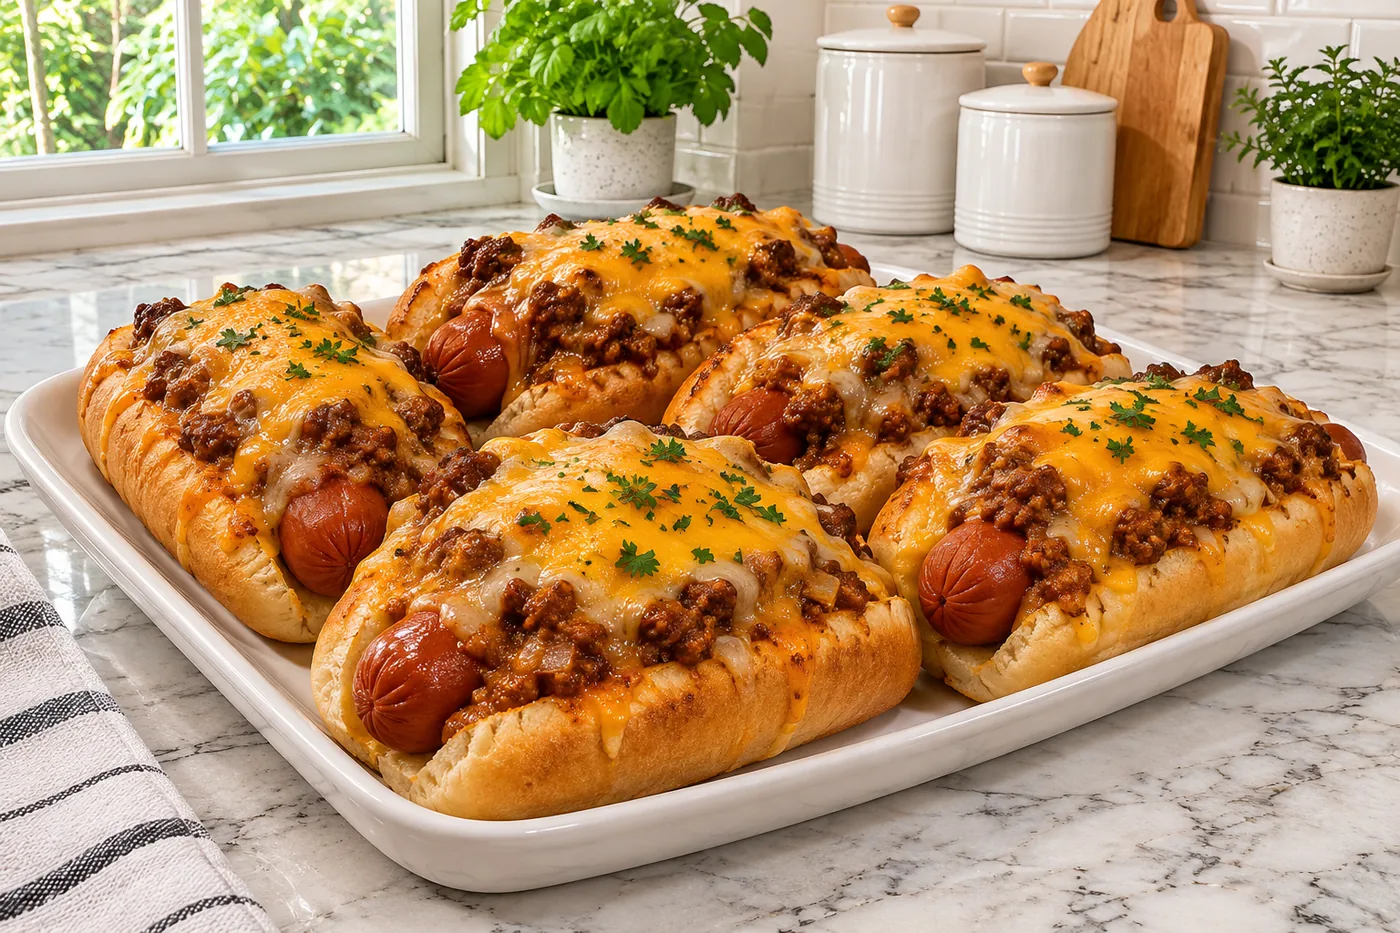
I remember the first time I took a bite of baked chili cheese dogs — the melty cheese and spicy chili danced on my taste buds, and I was hooked. These baked chili cheese dogs are not just your average comfort food; they're loaded with a blend of sharp cheddar and creamy Monterey Jack for that perfect gooey texture.
What sets this recipe apart is the homemade chili that simmers with just the right spices, creating a depth of flavor that enhances every bite. Trust me, once you try these, you'll never want the store-bought versions again.
Why This Recipe Works
- Flavor Fusion: The combination of chili and cheese creates a rich, savory profile that melds beautifully during baking. I love how the spices in the chili, combined with the melted cheese, create a harmonious flavor that enhances the hot dogs.
- Texture Contrast: Using whole wheat or regular buns adds a pleasureful chewiness that contrasts with the gooey melted cheese on top. I made this with both types of buns, and the whole wheat variety provided a slightly nuttier flavor that I really enjoyed.
- Moisture Retention: Baking the assembled chili cheese dogs allows the heat to steam the buns, keeping them soft and preventing them from drying out. The first time I made these, I didn’t cover them, and they turned out a bit too crusty, so I recommend using foil for the first part of baking.
- Flavor Depth: The garlic powder, onion powder, and smoked paprika work together to deepen the overall flavor profile, adding complexity without overpowering the dish. I’ve tried varying the amounts, and I found that sticking to the original ratios gives the best balance.
Ingredients
What You'll Need
- 8 hot dog buns whole wheat or regular; choose sturdy buns to hold the toppings without falling apart.
- 8 hot dogs beef or turkey; select your favorite for the best flavor.
- 1 can chili 15 oz, chili without beans preferred; look for a brand that’s thick and hearty.
- 1 cup shredded cheddar cheese for topping; sharp cheddar adds a nice bite.
- 1 cup shredded Monterey Jack cheese for topping; it melts beautifully and adds creaminess.
- 1 tbsp yellow mustard for drizzling; adds tanginess that balances the richness.
- 1 tbsp sour cream for garnish; provides a creamy contrast to the spice.
- 2 tbsp chopped green onions for garnish; adds freshness and a pop of color.
- 1 tsp garlic powder enhances the savory flavor.
- 1 tsp onion powder adds depth to the overall taste.
- 1 tsp smoked paprika brings a subtle smokiness that complements the chili.
- 1 tsp salt to taste; adjust based on your chili's saltiness.
- 1 tsp black pepper to taste; adds a bit of heat.
When shopping for your ingredients, try to find a good-quality chili that matches your taste. I love using a chili without beans for a smoother texture in these baked chili cheese dogs. Choosing fresh toppings like green onions and quality cheeses makes a big difference in flavor too.
Easy Substitutions
- Dairy-free: swap shredded cheeses for dairy-free cheese — the flavor will be milder, but you'll still get that melty goodness.
- Gluten-free: swap hot dog buns for gluten-free buns — the texture may be slightly different, but they’ll still hold up well.
- Lower calorie: swap regular hot dogs for turkey dogs — you’ll cut down on fat, but the flavor may be a bit lighter.
Step-by-Step Instructions
Prep & Bake Hot Dogs
- 1. Preheat your oven to 400°F (200°C) and line a baking sheet with parchment paper — this prevents sticking and makes cleanup a breeze.
- 2. Place the hot dogs on the prepared baking sheet and bake for 10 minutes — they should be plump and slightly browned when done, which adds a nice texture.
- 3. While the hot dogs are baking, heat the chili in a small saucepan over medium heat for about 5 minutes until it's warmed through — stirring occasionally ensures even heating and brings out the rich flavors.
Assemble & Melt
- 4. Once the hot dogs are done, remove them from the oven and nestle each one into a bun — the buns should be soft and warm to complement the hot dogs.
- 5. Spoon the chili evenly over each hot dog, allowing it to cascade down the sides — this is where the magic happens, ensuring every bite is flavorful.
- 6. Sprinkle a generous amount of shredded cheddar and Monterey Jack cheeses over the chili — this creates a deliciously gooey topping that melts beautifully.
Finish & Serve
- 7. Return the loaded chili cheese dogs to the oven and bake for an additional 5-7 minutes, until the cheese is melted and bubbly — keep an eye on them; you want a golden top without burning.
- 8. Remove from the oven and let cool for 2 minutes — this helps avoid burns and allows the flavors to settle.
- 9. Drizzle mustard over the top and add a dollop of sour cream for a creamy contrast — the tanginess of the mustard will enhance the flavors. Lastly, garnish with chopped green onions before serving, adding a fresh crunch to your baked chili cheese dogs.
Tips & Tricks
The Cheese Choice Matters
When it comes to baked chili cheese dogs, not all cheeses are created equal. I love using a blend of sharp cheddar and Monterey Jack for that perfect melty goodness. Sharp cheddar gives a rich flavor while Monterey Jack adds a creamy texture that makes every bite wonderful. I’ve tried using pre-shredded cheese before, but it never melts as beautifully as freshly shredded cheese does.
Avoid the Soggy Bun
One common mistake is using soft, fresh buns that can get soggy from the chili. I recommend toasting your hot dog buns lightly before assembling everything. Just pop them in the oven for a few minutes until they’re slightly crispy on the outside. This simple step makes a world of difference, keeping the buns sturdy enough to hold all that delicious chili and cheese without falling apart.
Pro Tips
- Use Quality Chili for Depth: Not all chili is created equal! I recommend using a hearty, homemade chili or a high-quality canned option. The flavors meld beautifully with the cheese and hot dogs, making each bite a flavorful experience.
- Broil for Extra Crispiness: For that perfect finish, broil your baked chili cheese dogs for a couple of minutes after baking. This technique gives the cheese a bubbly, golden crust that adds a pleasureful texture and a rich flavor.
- Chili Consistency Matters: The thickness of your chili can make or break your baked chili cheese dogs. Aim for a slightly thicker chili so it doesn’t make the buns soggy. I usually simmer my chili until it reduces a bit before adding it to the dogs.
- Prep the Night Before: Assemble your chili cheese dogs the night before and store them in the fridge. This saves time and lets the flavors meld together, resulting in an even tastier dish when baked.
- Experiment with Toppings: Don’t be shy with toppings! Fresh jalapeños, diced onions, or a sprinkle of cilantro can take your baked chili cheese dogs to the next level. I love adding a drizzle of hot sauce for an extra kick!
Variations & Customizations
Flavor Twists
BBQ Chili Cheese Dogs
Swap the can of chili for 15 oz of your favorite BBQ sauce mixed with 1 tsp of liquid smoke. The result is a sweet and tangy flavor profile that pairs beautifully with the smoky cheese, creating a messy but deliciously sticky bite.
Tex-Mex Chili Cheese Dogs
Add 1 cup of diced tomatoes with green chilies to the chili. Top with ½ cup crumbled tortilla chips and a sprinkle of chopped cilantro after baking. The dogs take on a spicy, zesty kick, with a pleasureful crunch from the chips.
Kid-Friendly
Cheesy Nacho Chili Cheese Dogs
Mix ½ cup of nacho cheese sauce into the chili before spreading it on the hot dogs. Top with 1 cup of crushed nacho chips and drizzle with additional cheese sauce. The dogs become gooey and cheesy, perfect for little hands and big smiles.
Storage & Meal Prep
Room Temperature
Baked chili cheese dogs can sit at room temperature for up to 2 hours in a covered dish. After that, they should be refrigerated to keep them safe and fresh.
Refrigerator
They'll stay good for 3-4 days in an airtight container. Make sure to cool them completely before storing, and wrap each dog individually in plastic wrap to avoid sogginess.
Freezer
You can freeze baked chili cheese dogs for up to 2 months. Flash freeze them on a sheet pan first, then wrap individually in foil or plastic wrap. To thaw, simply place them in the refrigerator overnight before reheating.
Meal Prep
I recommend doubling the recipe if you're feeding a crowd or want leftovers. Prepping the night before works great; just store them in an airtight container. They’ll stay fresh in the fridge for up to 4 days. For reheating, pop them in the oven at 350°F for about 15 minutes until heated through.
Frequently Asked Questions
Can I use turkey hot dogs for baked chili cheese dogs?
Yes, turkey hot dogs are a great substitute for traditional hot dogs. They provide a leaner option while still delivering on flavor, especially when topped with chili and cheese.
How do I prevent my chili cheese dogs from getting soggy?
To avoid soggy buns, toast them lightly before adding the hot dogs and toppings. This creates a barrier that helps keep the buns firm even after baking.
What can I use instead of store-bought chili?
You can make your own chili from scratch using ground meat, beans, tomatoes, and spices. This allows you to customize the flavors and control the ingredients, ensuring a fresher taste.
Are there any gluten-free options for baked chili cheese dogs?
Absolutely! You can use gluten-free hot dog buns and ensure that your chili is gluten-free as well. Just check the labels or make your own chili to be safe.
Why did my baked chili cheese dogs turn out dry?
Dry baked chili cheese dogs often result from overbaking or using low-fat cheese. Make sure to bake them just until the cheese is melted and bubbly, and consider adding a bit of moisture to your chili.
Baked chili cheese dogs have a way of bringing everyone together for a fun, casual meal that's full of flavor. For an extra touch, try adding some jalapeños or diced onions for a little kick. I can't wait for you to try these — leave a comment to share your thoughts or pin the recipe for a cozy night in!